Lesson 6: Read a Map
"The map shows you where to go before you get there"
| Time | 30-60 minutes |
| Space | Gym, schoolyard, or local park |
| Materials | Checkpoints with animals and numbers, 4 colored landmark cones, Pattern maps (simple dot maps with colored corners), Small whiteboard and markers (or paper), Cones (optional, for marking boundaries) |
| Setup | Arrange checkpoints in a simple geometric pattern with colored landmark cones at corners |
| Vocabulary | Map, Orient the map, Landmark |
Activities
warm-up
Boundary Run
Warm up: quick review of the boundary.
core
Geometric-O
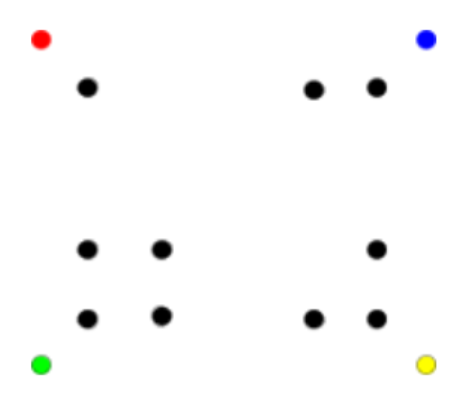
Use a simple map to find checkpoints.
Goals
Orienteering Goals
- Orient a map so it matches the real space
- Use a simple map to find checkpoints
- Match dots on the map to cones on the ground
- Use colored landmarks to keep the map oriented
PE Standards (SHAPE America)
Standard 1: Motor Skills
- Demonstrates a variety of locomotor skills with the concepts of space, effort, and relationship awareness (1.2.1). Students walk and run between checkpoints while navigating with a map.
Standard 2: Movement & Fitness Concepts
- Recognizes personal space and where to move in general space (2.2.1). Students connect dots on a map to cones on the ground, translating 2D spatial relationships into movement through 3D space.
- Demonstrates knowledge of locomotor, non-locomotor, and manipulative skills in movement settings (2.2.4). Students apply locomotor skills purposefully, choosing speed and direction based on map reading.
Standard 3: Social Skills
- Uses communication skills to share space and equipment (3.2.3). Pairs share the map and discuss which cone to visit next.
- Discusses problems and solutions with teacher support in a physical activity setting (3.2.8). When a pair goes to the wrong cone, they talk through what went wrong and re-orient the map.
See PE Standards alignment for the full framework.
Delivery
- Boundary Run: quick review
- Gather students facing the arrangement of cones. Show the whiteboard map. "This is a picture of our cones from above. Each dot is a cone. The colored corners are the big colored landmark cones."
- Hold the map upside down. "Something is wrong. Can you tell?" Slowly rotate until students shout "Stop!" when it matches.
- Find the Cone: teacher circles one dot on the map. "Go stand by that cone." Students orient the map and walk to the right cone. Check the animal picture to confirm.
- Pair up. Give each pair a simple map with 2-3 circled checkpoints.
- Geometric-O: visit the circled checkpoints in order. The animal picture at each cone confirms the right one. Return to the start when finished. Did you get them all right? What happened when the map didn't seem to match?
- Pairs who finish get a new map with more checkpoints.
Reflection
- How did you know the map was right-side up? What helped you keep it that way?
- How was using a map different from using a clue sheet?
- What would you tell someone who has never used a map before?
Extensions
- Remove the colored landmark cones (harder to orient)
- Add more checkpoints
- Try the same map a second time; can you do it faster?
- Students design their own simple map for another pair to follow